进入 PyTorch 2.0 时代,抓取计算图变得越来越容易。虽然 PyTorch 及其生态已经有一些抓取计算图的工具,但这篇文章的主要目的是用最少的代码抓取并保存 正向传播和反向传播计算图,通过实践掌握 AOTAutograd 中抓取计算图的核心原理。
话不多说,先上代码:
import time
import torch
import torch.utils._pytree as pytree
from torch.utils._python_dispatch import TorchDispatchMode
from torch.utils.weak import WeakIdKeyDictionary
from graphviz import Digraph

__all__ = ["capture"]

class CaptureGraph(TorchDispatchMode):
    def __init__(self, fname="graph.dot"):
        self.fname = fname
        self._graph = Digraph(format="svg")
        self._tensors = WeakIdKeyDictionary()
        self._n_tensors = 0
        self._n_ops = 0

    def __torch_dispatch__(self, func, types, args=(), kwargs=None):
        out = func(*args, **kwargs)
        op = f"{func}_{self._n_ops}"
        self._n_ops += 1
        self._graph.node(op, str(func), fillcolor="green")
        self._add_to_graph((args, kwargs), op, is_in=True)
        self._add_to_graph(out, op, is_in=False)
        return out

    def _add_to_graph(self, args, op, is_in=True):
        flat_args, _ = pytree.tree_flatten(args)
        for t in flat_args:
            if not torch.is_tensor(t):
                continue
            if t not in self._tensors:
                tensor = f"tensor_{self._n_tensors}"
                self._graph.node(tensor, fillcolor="skyblue")
                self._tensors[t] = tensor
                self._n_tensors += 1
            else:
                tensor = self._tensors[t]
            if is_in:
                self._graph.edge(tensor, op)
            else:
                self._graph.edge(op, tensor)

    def __exit__(self, exc_type, exc_value, traceback):
        super().__exit__(exc_type, exc_value, traceback)
        self._graph.render(self.fname)

def capture(model, *inputs):
    primals = [p for p in model.parameters() if p.requires_grad]
    primals.extend([p for p in inputs if torch.is_tensor(p) and p.requires_grad])
    with CaptureGraph(f"dispatch.{time.time()}.dot"):
        loss = model(*inputs).sum()
        grads = torch.autograd.grad(loss, primals)
用下面一个简单的模型作为实验:
import torch.nn as nn
model = nn.Sequential(
    nn.Conv2d(16, 32, 3),
    nn.BatchNorm2d(32),
    nn.SiLU(),
).cuda()
x = torch.randn((2, 16, 8, 8), requires_grad=True, device="cuda")

capture(model, x)
可以看到,我们成功用 50 行代码抓取了一个简单模型的正向传播和反向传播计算图。
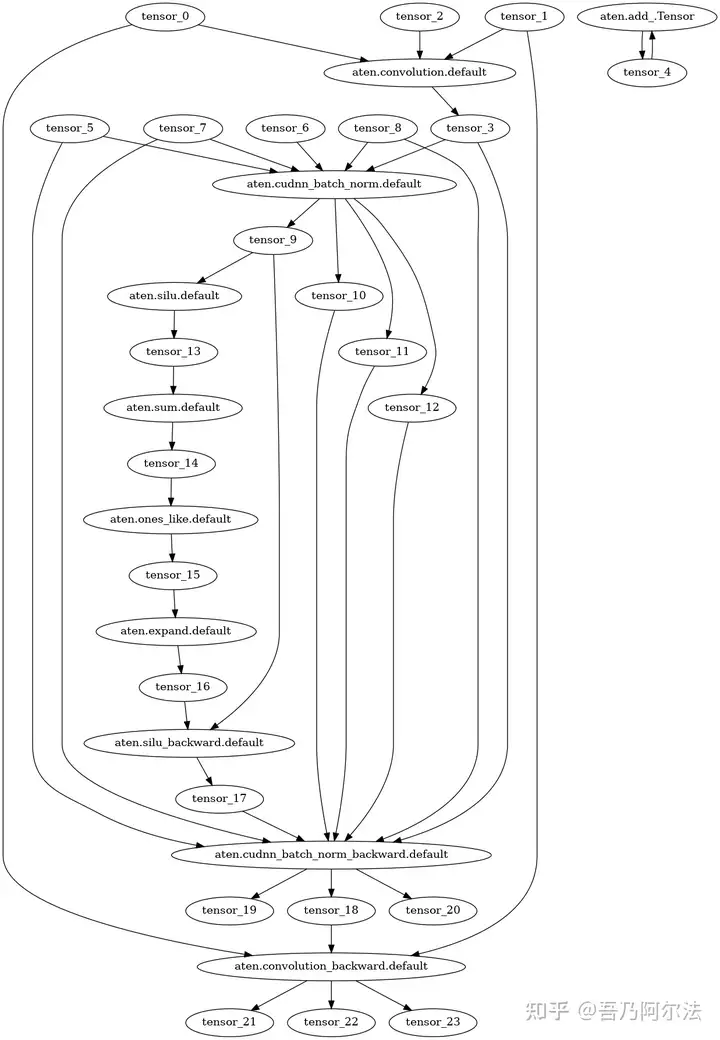
这里抓取正向传播和反向传播计算图的原理是:
__torch_dispatch__: 在TorchDispatchMode下,每一个算子最后都会被 dispatch 到 Python 函数__torch_dispatch__,我们在这里捕获算子及其输入、输出 tensor;- 使用
graphviz的Digraph来保存计算图,为每一个算子和 tensor 创建一个节点; - 使用
WeakIdKeyDictionary记录出现过的 tensor,把 tensor 映射到Digraph的节点;
关于 __torch_dispatch__ 的详细原理可以参考我的另一篇文章: 一文搞懂 AOTAutograd 原理。
当然,50 行代码只是实现了最基本的功能,有些问题是没有考虑的,包括但不限于:
- 当用于捕获计算图的输入 tensor 中包含重复;
- 计算图中包含 inplace 算子;
- 计算图中死代码未消除;
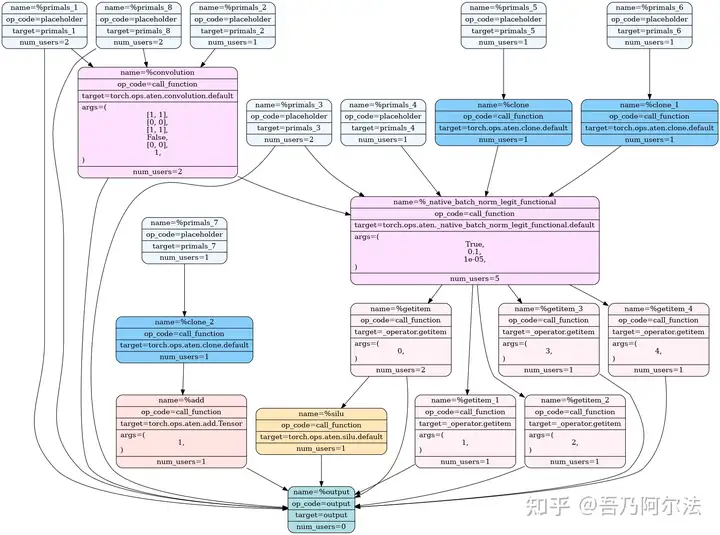
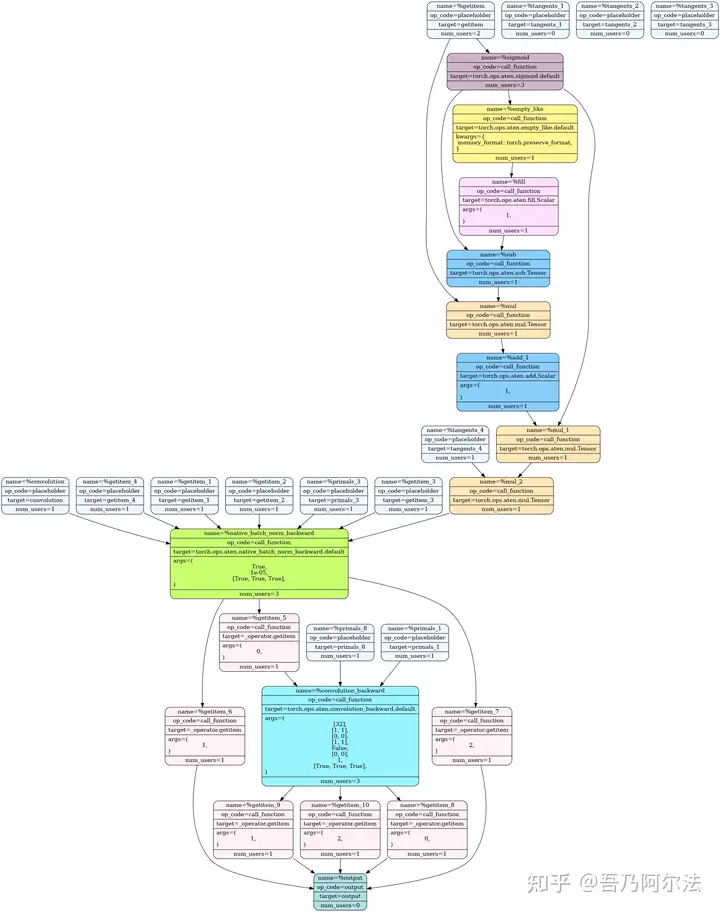
作为对比,我们可以通过 AOTAutograd 得到分开的正向传播和反向传播计算图:
import torch
import time
from functorch.compile import aot_module, make_boxed_func
from torch._functorch.partitioners import draw_graph

def my_compiler(fx_module: torch.fx.GraphModule, _):
    draw_graph(fx_module, f"aot.{time.time()}.svg")
    return make_boxed_func(fx_module.forward)

def capture(model, *inputs):
    aot_model = aot_module(model, fw_compiler=my_compiler)
    y = aot_model(*inputs)
    y.sum().backward()
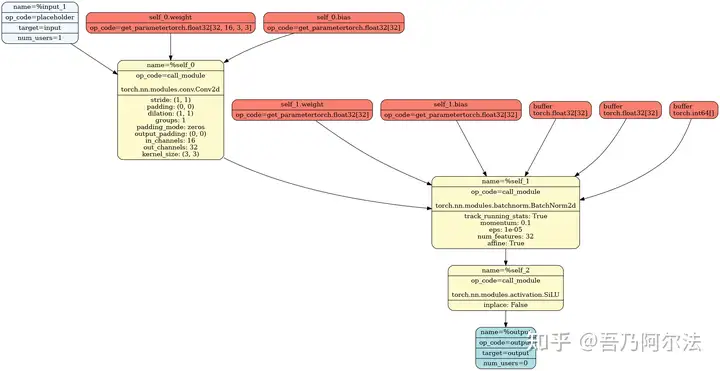
我们也可以用 torch.compile 抓取正向传播计算图:
import torch
import time
from torch._functorch.partitioners import draw_graph

def my_compiler(fx_module: torch.fx.GraphModule, _):
    draw_graph(fx_module, f"compile.{time.time()}.svg")
    return fx_module.forward

def capture(model, *inputs):
    compiled_model = torch.compile(model, backend=my_compiler)
    y = compiled_model(*inputs)
    y.sum().backward()
以上代码已经放在 alpha0422/torch-graph 中,如有兴趣改进,欢迎提交 PR。